Learning about React hooks and state by example
2021-12-20

In this tutorial, we're going to learn how and when to use React hooks like useState, useEffect, useRef, and the lesser-known useImperativeHandle. We'll do that by building a One Time Password (OTP) custom input component. The final version of our component will look and behave like in this animation:

The final version of the code for this tutorial is available on CodeSandbox:

Before diving into React, we're going to introduce the notion of state with HTML and vanilla JavaScript. We'll explain why the value prop works differently in React, and learn the difference between controlled and uncontrolled inputs. With all that knowledge, we'll be in a good position to start creating our custom OTP input component, and adding features to it while learning about hooks.
Back to basics: HTML inputs and Vanilla JavaScript
The following HTML code sets up an <input> element, and attaches a change event handler to it using plain JavaScript:
A few observations:
- The HTML input's
valueattribute is used as the initial value of the input on page load - We can change the value of the input by typing or deleting in the field
- If we have a reference to the DOM input element, we can setup a function to be called when there's user input in the field. We usually refer to such functions as event handlers
- When our event handler gets called by the browser, it receives a DOM Event object as its first argument.
- The event object has a property called
targetwhich is a reference to the input element that was changed event.target === inputRef. The two variables have the same value: a reference to the DOM input- The DOM input element, referred to by
event.targetORinputRef, has a property calledvalue. This property contains the current value of the input. It's effectively the internal state of that DOM input.
In the code below, we attempt to take control of the input's value and make it uppercase, no matter how the user is typing:
The way we do this is to attach an event listener like we did in the previous example, then modify the value of the input field by setting it to its uppercased version. There's one inconsistency: the initial value, which comes from the HTML code, isn't in uppercase. We can fix this by setting the input's value to its uppercase version when we get a reference to the input -- line 19 in the code above.
Next, let's see how the same <input type="text" value="Tarzan" /> behaves when used in a React component
Bringing it to React: value vs. defaultValue
The following code sample sets up a React app that renders a single <input> element. Like in the HTML example above, the input is rendered with a value prop. For the moment, we're not attaching any event handlers to the input.
A few observations:
-
We get a warning in the console:
Warning: You provided a `value` prop to a form field without an `onChange` handler. This will render a read-only field. If the field should be mutable use `defaultValue`. Otherwise, set either `onChange` or `readOnly`. at input at div at App -
If we type in the input field, the value doesn't seem to be changing like it did in the HTML example
-
If we change the prop that we're using from
valuetodefaultValue, then the behavior reverts to the one in the HTML example -- try it now.
In this section we'll understand why the behavior of the same piece of code -- <input type="text" value="Tarzan" /> is different when used in an HTML document and in a React component.
HTML Parsing and the DOM: hand waving 101
When a browser loads up an HTML file, it needs to transform the HTML content -- basically text -- into something visual for the user. The HTML document if first parsed into a tree of objects that represent the document. This tree of objects is called the DOM (Document Object Model). It can be accessed by JavaScript in order to make the loaded HTML page more interactive.
The browser provides functions such as querySelector and getElementById which allow a JavaScript program to find DOM nodes after the HTML was parsed by the browser. The JavaScript code running on the page can completely transform the look of the page by manipulating the DOM.
React and the DOM
React manipulates the DOM for us based on the output of the components we write. At a high level, the way React does that is:
- React calls our component's rendering function once. If our component is using other custom components, their rendering functions will be called too. Eventually, the tree created from rendering these components will end with
divs,spans, and any other basic HTML element. - React takes the output tree of React elements -- simple objects that describe DOM elements --, and makes the necessary DOM calls to create the actual DOM elements.
- An element somewhere in the tree needs to be re-rendered. This can be caused by two situations:
a. Just like HTML input elements that hold their state -- e.g. the value of the input (a string), whether it's focused or not (a boolean), etc. -- React components can also have internal state variables. Note, the state is not per component, but per instance of a component, a subtle but important difference. For example, a custom
<Alert>component can be used multiple times in the same app, and each instance ofAlertwill have its own states. These state variables are created by using theuseStatehook. Changing the value of this state will trigger a re-render of the instance. b. Just like some HTML elements accept attributes that modify their behaviour -- for example thesrcof image elements -- React components can also accept values that modify their behavior, these are called props (here again the props are passed to instances of a component). If a component instance gets different values for its props as part of a render cycle, then it'll get re-rendered as well. - React takes the new output tree of React elements, compares it to the previous output (from step 2), and again makes the necessary DOM calls to match the new rendering output. In most cases this is a lot less work than re-creating the new output from scratch. For example, if an avatar rendered in the header of a page has a state change and needs to be re-rendered with a red dot in the top-right corner, it's easier to just add the red dot rather than re-build the whole page.
- Go to step 3
The consequence of this rendering process is that the output of rendering a React component instance represents how that instance should look at any point in time. This is very different from writing HTML, where the HTML only represents how the page should look when initially loaded.
That's why, if we render an <input> instance with a fixed value, then we're telling React to always make sure the <input> has that same value, after every rendering cycle. If that's what we want to do -- for example we want the UI to look like an input field but read-only --, we have to tell React that we know what we're doing by passing an additional readOnly prop to the input. If instead what we mean is to pass an initial value to the input, like we can do in HTML, then React wants us to use the defaultValue prop instead of value.
Taking control with controlled components
In most cases though, when we pass a value prop to an input, we want the value to be able to change. But why would we want to do that at all? Why not let the input manage itself, and extract the value from it when we need it, by using a reference to the input? Here's a code sample that does exactly that:
The createRef function creates an object that can hold a reference in its .current property. When we pass this object as the ref prop to an element, React will assign as a reference the DOM node that it creates during its rendering process. We setup a click event handler on the button. When the button is clicked, we get the reference to the DOM element, grab its value like we did in vanilla JavaScript, and print that to the console.
What if, instead of printing the value of the input to the console, we wanted to render the number of characters in the input as part of the UI? To do that, we need to render that value -- the number of characters in the input -- somewhere in the UI, and we need to make sure that the value changes whenever the input field changes. Here's a first attempt at this:
Here, as part of the rendering, we output inputRef.current.value.length. Since a ref only gets attached when React modifies the DOM, there are times when inputRef.current is null so we always need to check for that. The first rendering will therefore always output "input field not attached", because the DOM only gets created after the first render.
But then, as we start interacting with the input field, the "input field not attached" text never goes away. Why is that? Even though the value of inputRef.current.value changes, React isn't aware of this change and doesn't know that it needs to re-render our component instance. Re-rendering only happens as a result of a change in state, or a change to the props. Our App component isn't using any props, and it isn't using any state. Here's another failed attempt at fixing this:
In the example above, we create a variable that should hold the length of the input. Then, we attach an onChange handler to the input field, and update the value of the variable. Just to make sure, we also console.log the new value. But what do we see again? The console.log seems to output the correct value, but the UI isn't updating and still shows 0. This is the same issue as above: even though we're changing the value of a variable, React isn't aware that we're doing this, it's not observing that variable. The only things that React observes are props and state.
So we'll really need to create a change in state in order for our component to re-render. When should this state change? Whenever the value of the input changes. We already know how to get notified of a change in the input: we just have to add an onChange handler to the input. And we already know how to create a new state in our component: we have to use the useState hook. Here's how calls to useState are usually written:
const [nameOfStateValue, setStateValue] = useState(initialValue);
This syntax can be quite obscure for a beginner. The useState function returns two values. Well, functions can only return one value in JavaScript, so useState returns an array with two values inside it. The first is the value of the state at the point when the rendering is happening; the second is a function that can be used to change the state. It's calling this function with a new value that will cause a re-render. React will re-render a component instance any time any of its state values change. The syntax const [a, b] = c is called destructuring. Here, c is an array that already exists, and a and b are new variables that will be created: a will hold the value of the first element of the array, and b will hold the value of the second element of the array. If the array has more elements, they'll be discarded. If the array has less than two, then a or b will simply be `undefined.
Equally as obscure as the syntax is probably the way that useState operates. Here's a rough overview:
useStateacts differently depending on whether it's the first rendering of a component instance, or a subsequent rendering.- The first time a component instance gets rendered,
useStatewill tell React to create a new piece of state for this instance -- think of it as a box --, and will set the value of that state to whateverinitialValueit receives.useStatewill then return the pair [value, setValue]. - Starting from the second re-render of a given instance, the call to
useStatewill simply retrieve the current value of the state from the box, and return it with the samesetValuefunction. - Since
useStatecan be called multiple times per rendering to create multiple of these "boxes", the order in which they get called is important: the firstuseStatewill be linked to the first box, the seconduseStatewill be linked to the second box, etc. This is why every execution of the rendering function has to call the same number of hooks: it's the order of calling these hooks that tells React which piece of state to grab: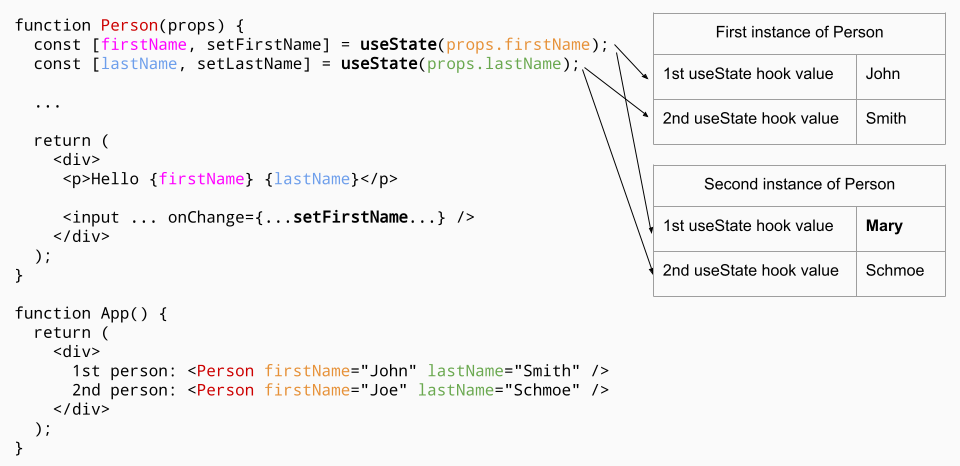
Here's a working example of using useState to keep track of the length of the input field:
In the example above we create our first state variable, inputLength. We initialize its value to 0, and update its value using the setInputLength function returned by the hook. We call setInputLength in the change event handler of the input element. We can fix the wrong initial value by setting it to "Tarzan".length, or even just 6, but we'll see that we can do better. First, let's add another feature where we also render the value of the input field, but in uppercase:
While the code sample above works, there's a subtle but very important issue with it: the two pieces of state that we're maintaining in our component are redundant. They can both be derived -- read "computed" -- from a single piece of state: the value of the input field. As a rule of thumb, state should not contain derived values. The redundancy opens the door to inconsistencies by forgetting to update one of the derived values.
To fix that, we take control of the input field by removing its need to maintain its own internal state. We drive the input by passing it a value prop that comes from our state, and updating our state when we get notified that the value of the input changes. The input then becomes a "controlled component" -- more precisely a controlled instance of the component. This keeps everything consistent, since there's only one source of truth. Any derived value can simply be computed on the fly.
In the case of our example, the only value we'll be keeping in state is the value of the input. We call that the "source of truth": the essential value that can be used to derive other values. Our derived values are:
- The length of the input, which can be computed as
value.length - The uppercased input, which can be computed as
value.toUpperCase()
Here's the final, correct code with only one useState. Notice that everything is always consistent:
Limiting the length of the input field
Now that we have control of the HTML input, let's start adding some logic that's specific to OTP codes. Let's assume that the length of the OTP codes we want to allow is always six digits, and enforce that through the value setter:
The only differences between the example above and the one before it:
- We moved the input change handler from an inline function to a named function
- Before calling the React state value setter, we limit its length to
OTP_LENGTHcharacters
Now all that logic is in the App component, so let's move it out to a separate OtpInput component:
With the component in place, all the logic for it has moved away from the app. We don't need to import useState in App anymore, since the input component is managing its own state. But we get the same problem that we had before: now App has no way of controlling or knowing what's going on in the OTP input. The number of digits is fixed to six by the component. Also, unlike a regular HTML input element, our element can't even accept a ref and therefore can't expose a .value. We'll see how to do that later, but for the next step, we'll allow our component to be controlled by its own props so that we can lift the value back up to app and have some logic, such as disabling a button if the OTP isn't entered completely.
Making the component controllable
In this next example, we add three props to the OtpInput component:
otpCode, which is a string that corresponds to the controlled value of the inputonCodeChange, a function which allows us to be notified when the code has changed inside the component, to update our own statenumDigits, an optional prop that determines the number of digits for thisOtpInputinstance. If not defined it'll default to6.
Here is the modified code, including changes in App.js to use the new props:
It might seem redundant to receive an otpCode prop and just pass it down as a value prop to the HTML input, but that's the most basic thing we can do. Now that we have this props API setup, we're going to start making our custom input look like an OTP code, slowly learning about hooks in the process.
Part 2 of this tutorial will continue building the OTP component, going over useEffect, useRef, and other hooks in the process.